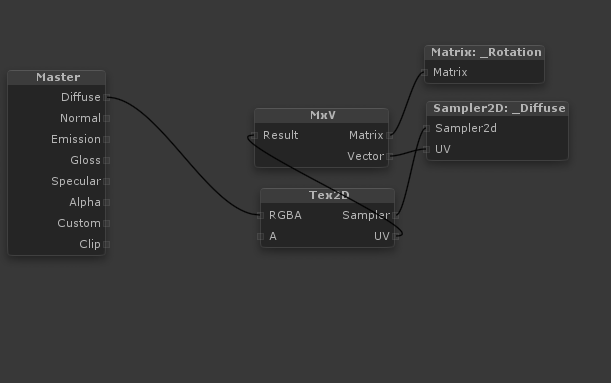
One thing that has annoyed me for quite some time is rotating textures in SSE. Although the Unity docs provide a Shaderlab example, I was hoping for a solution i could incorporate into a shader graph. Today, i found that solution.To keep this simple, we will only focus on the parts relevant to texture rotation, and essentially create
this Shaderlab example in SSE. To begin grab a Sampler2d and a Matrix and declare both of the properties. Next we multiply the UVs by the matrix via the MxV node (matrix*vector) by plugging our declared Matrix to matrix, and our Sampler2d’s UV’s to vector. Then simply plug the result into the uvs of a Tex2d and our Sampler2d into the sampler input. The tex2d can then be used to in whatever you desire to rotate(diff, emissive, etc…).
Once you have saved and exported your graph, you will have a matrix property in your shader that is hidden in the editor. To rotate things, we need to pass a matrix to this property. This can be done in the same way as the Shaderlab example, by creating a small script in Javascript or C#. Here is an example in Javascript:
#pragma strict
var rotateSpeed = 5;function Update ()
{
var rot = Quaternion.Euler (0, 0, Time.time * rotateSpeed);
var m = Matrix4x4.TRS (Vector3.zero, rot, Vector3(1,1,1) );
renderer.material.SetMatrix (“_Rotation”, m);
}
This gives us a matrix transformation of the UVs with a translation of 0, a rotation being changed on update, and a scale of 1. After these are calculated, the matrix is then passed into the shader’s matrix property – “_Rotation” in this case.
Now simply drag this script onto any object in your scene that has the shader we created earlier applied. Once you press play you should see it rotate. One thing to note is that the rotation is based on the 0,0 location in UV space, so it will always rotate around the corner. This is not necessarily a limitation: If you layout your uvs with this in mind you should not have an issue. For example, here is the UV layout of an object who’s texture rotates around the center of the object:
As you can see, ive divided it into 4 segments, who’s UVs are stacked and rotated so that they tile around the center of the object. Since the rotation transformation takes place in UV space, the rotation for all 4 segments is seamless, and looks like it occurs from the center of the object. Alternatively, you can offset your texture in the material by -.5 and -.5 but this may lead to undesireable results


Hi,
Thanks a lot for uploading this, i’m looking to rotate UVs with strumpy. I’m just wondering- where do you put the code that you mention?
I can’t see any update function when I open the .shader file.
Oh my bad. I forgot to mention that the update function is part of an external script that is attached to your object. I’ll update the post momentarily 🙂
Greeat read